HuabanWallpaper 是一个抓取图片并设置壁纸的小工具,目前可以运行在Ubuntu系统上。
HuabanWallpaper用Python 编写,使用Scrapy 框架进行抓取,运行在Ubuntu 上。当前版本环境是:Scrapy0.24,Python2.7,Ubuntu14.04。
本项目的代码开放在Github上 。
Scrapy 是一个抓取web站点并提取内容的开源框架,目前支持Python2.7。安装过程详见官网 ,针对Ubuntu系统有一些额外注意的问题 。官网 ,另外有一个中文翻译计划 ,不过里面的内容不太全并且很多已经过时。建议可以先快速浏览中文了解概念,然后根据需求细读英文官网。Scrapy的入门教程 。
设置HuabanWallpaper为当前目录,在Terminal中运行python main.py。
项目的GUI界面会弹出,输入想要抓取的花瓣画板的网址,如http://huaban.com/boards/344630/。
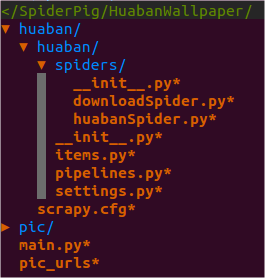
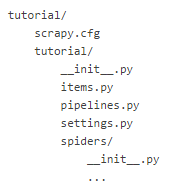
scrapy startproject huaban自动生成的工程目录。并对其他默认生成文件如items.py 、pipelines.py 、settings.py进行编辑。
Scrapy生成的工程都有与huaban子目录相同的目录结构。本项目是在其上又添了一层,用于添加GUI等辅助功能,使用Scrapy的API接口处理爬虫功能。
简单流程如下:
在顶层目录HuabanWallpaper创建main.py ,写基本的GUI。使用scrapy命令创建huaban工程项目。
定义huabanItem。表示要抓取的图片信息的结构体。
编写huabanSpider。分析网页,将信息填入item。
编写huabanPipeline。将item里的数据取出,拼接为完整图片url,存入xml文件。
使用Scrapy控制台测试huabanSpider等一系列功能。
编写downloadItem。表示图片的结构体。
编写downloadSpider。分析之前保存的xml文件,填充item。
编写huabanPipeline。下载图片。
使用Scrapy控制台测试downloadSpider等一系列功能。
在main.py中调用scrapy的API控制爬虫运行。
编写设置为壁纸的功能代码。
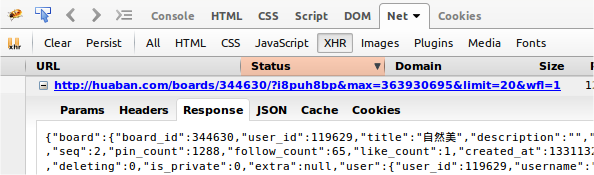
打开一个花瓣画板,使用Chrome查看网页源代码(Firefox的页面不换行,看着麻烦)。可以看到在第7-14行的script标签内的javascript中包含了一组一组单独图片的信息,格式类似:
1 2 3 4 5 6 7 8 {"pin_id" :362744150 , "user_id" :119629 , "board_id" :344630 , "file_id" :72016656 , "file" :{"farm" :"farm1" , "bucket" :"hbimg" , "key" :"c0637c5df70fd08a5434226e0fb08c138d0b26692e249-c0mNjH" , "type" :"image/jpeg" , "width" :531 , "height" :800 , "frames" :1 }, "media_type" :0 , "source" :"redbubble.com" , "link" :"http://www.redbubble.com/people/jasonfitzgibbon/works/12415387-gudbrandsdalslagen-norway?ref=work_carousel_work_portfolio_1" , "raw_text" :"(40) Tumblr" , "text_meta" :{}, "via" :362724638 , "via_user_id" :974342 , "original" :362715855 , "created_at" :1429355336 , "like_count" :0 , "comment_count" :0 , "repin_count" :0 , "is_private" :0 , "orig_source" :null , "hide_origin" :false }
通过打开该图片http://huaban.com/pins/362744150/zoom/的大图地址http://img.hb.aicdn.com/c0637c5df70fd08a5434226e0fb08c138d0b26692e249-c0mNjH可以知道,图片信息中的pin_id是该图片的标志号,可以用来在花瓣上找到该图片;key是图片地址的标志号,可用来下载图片;type是图片的文件类型。
花瓣的画板是动态加载的,一次只加载20张图片,用户使用过程中通过拖动到页面底部加载后20张图片。http://huaban.com/boards/344630/?i8puh8bp&max=363930695&limit=20&wfl=1http://huaban.com/boards/344630/?i8puh8br&max=362253714&limit=20&wfl=1。USER_INPUT?A&max=B&limit=20&wfl=1。
为证明我们的猜想,让我们深入虎穴,看看生成调用命令的js文件mootools.js。Date,果然找到了蛛丝马迹。
1
2
var q=Date.now(); String.extend("uniqueID",function(){return(q++).toString(36)}
这个uniqueID名字就看起来超可疑是不是,我们再搜索它。
1
2
3
4
var k=f.lastIndexOf("/"); k>-1&&(k=f.indexOf("#"))>-1&&(f=f.substr(0,k)), this.options.noCache&&(f+=(f.contains("?")?"&":"?")+String.uniqueID()), e&&g=="get"&&(f+=(f.contains("?")?"&":"?")+e,e=null);
罪证坐实!那么这个uniqueID其实就是当前时间的毫秒数再加1,再转为36进制的字符串。
huabanItem里定义了从网页要抓取的信息的数据结构。前文我们已经分析了需要哪些字段。这里 ,之后不再声明。
1
2
3
4
5
class HuabanItem (scrapy.Item) : folder = Field() pin_id = Field() key = Field() pic_type = Field()
folder是该图片所在的画板名,pin_id是图片的id,key是前文分析的图片地址标识串,pic_type是图片的格式。
huabanSpider执行主要抓取动作。抓取当前页面所需字段并存入item,之后发送js命令加载更多图片,如此循环。
1
2
3
4
5
6
7
8
9
10
11
class huabanSpider(CrawlSpider): name = 'huabanSpider' allow_domain = ['huaban.com'] start_urls = [] last_num = "000000000" # get start_url from user input. def __init__(self, **kw): ... # Parse javascript strings under xpath script using regex. def parse(self, response): ...
name用来唯一标识一个Spider。start_urls包含Spider启动时最初抓取的url列表。后续抓取的页面都从此列表中的页面生发。__init__自然是类的初始化函数,此处可以传入参数。parse()负责解析Response,提取数据生成item,并生成后续Request。
一一来看。
1
2
3
4
5
6
def __init__ (self, **kw) : super(huabanSpider, self).__init__(**kw) url = kw.get('url' ) or kw.get('domain' ) or 'http://huaban.com/boards/344630/' if not url.startswith('http://' ) and not url.startswith('https://' ): url = 'http://%s/' % url self.start_urls = [url]
在__init__函数中唯一值得注意的是参数**kw,此处利用它将用户输入的画板url传入start_urls中。即让用户自定义从哪个页面开始抓取。
1 2 3 4 5 6 7 8 9 10 11 12 13 14 15 16 17 18 19 20 21 22 23 24 25 26 27 28 29 30 31 32 33 34 35 36 37 38 39 40 41 42 43 44 45 46 47 def parse (self, response) : for sel in response.xpath('//script' ).re("\{\"pin_id.*?hide_origin.*?\}" ): item = HuabanItem() item['folder' ] = response.url.split("/" )[-2 ] spinid = re.findall(u"pin_id..\d*" , sel) if spinid and spinid[0 ]: sspinid = spinid[0 ].split(":" ) if sspinid: self.last_num = sspinid[-1 ] item['pin_id' ] = self.last_num skey = re.findall(u"key\":\"\w+-\w+\"" , sel) if skey and skey[0 ]: sskey = skey[0 ].split("\"" ) if sskey: item['key' ] = sskey[-2 ] spictype = re.findall(u"type\":\"\w+/.+?\"" , sel) if spictype and spictype[0 ]: sspictype = spictype[0 ].split("\"" ) if sspictype: ssipictype = sspictype[-2 ] if ssipictype: ssspictype = ssipictype.split("/" ) if ssspictype: item['pic_type' ] = ssspictype[-1 ] yield item yield Request(url = self.load_more(self.start_urls[0 ], self.last_num), callback = self.parse) def ten_to_thirtysix (self, num) : loop = '0123456789abcdefghijklmnopqrstuvwxyz' result = [] num = int(num) while num != 0 : i = num % 36 result.append(loop[int(i)%36 ]) num = num / 36 result.reverse() return '' .join(result) def load_more (self, url, no) : milliseconds = time.time()+1 uniqueid = str(self.ten_to_thirtysix(milliseconds)) resulturl = '%s' % str(url+"?" +uniqueid+"&max=" +self.last_num+"&limit=20&wfl=1" ) return resulturl
parse函数的主要操作就是利用xpath 和正则表达式提取出需要的内容并放入item,然后发送可能需要的后续request。{pin_id...hide_origin..}的一段话,再针对每个满足这个条件的一段话,用正则表达式提取其中pin_id、key、pic_type部分内容(此处变量判空比较恐怖,不知Python中怎么写比较优美?)。load_more函数的功能就是拼接前文讲过的js加载命令,其中用到了将10进制转为36进制的成员函数ten_to_thirtysix。
有一点需要注意的是xpath()或css()命令返回的是Selector ,后面可以继续接更多的xpath()等。而re()返回的是字符串。
如果对xpath路径是否正确不太自信,可以在控制台实时测试一下。在Terminal中运行对网页的调试scrapy shell "http://huaban.com/boards/344630/"或对本地文件的调试scrapy shell "file:///media/sf_haha/SpiderPig/HuabanWallpaper/pic_urls"。然后运行类似response.xpath('//title').extract()的命令查看xpath结果。Ctrl+D退出。官网教程中对此也有讲解。
huabanPipeline对抓取到的item进行后处理。即用item中的字段拼接图片url,写入xml文件。
1 2 3 4 5 6 7 8 9 10 11 12 13 14 15 16 17 18 19 20 21 22 23 class HuabanPipeline (object) : def __init__ (self) : self.doc = ElementTree() self.allpic = Element("all_pic" ) self.allpic.tail = '\n' self.doc._setroot(self.allpic) def process_item (self, item, spider) : if spider.name == 'huabanSpider' : url = [item['pin_id' ], "http://img.hb.aicdn.com/" +item['key' ], item['pic_type' ], item['folder' ]] pic = Element('pic' ) pic.tail = '\n' self.allpic.append(pic) SubElement(pic, 'pin_id' ).text = url[0 ] SubElement(pic, 'pic_url' ).text = url[1 ] SubElement(pic, 'pic_type' ).text = url[2 ] SubElement(pic, 'folder' ).text = url[3 ] return item def close_spider (self, spider) : if spider.name == 'huabanSpider' : self.f = open('pic_urls' , 'w' ) self.doc.write(self.f) self.f.close()
__init__函数对建立xml树做了一些创建工作。process_item将item中的字段取出,拼接成完整的url,添加到xml的子树上。close_spider打开待写入的文件,写入xml后关闭。
另外注意,使用pipeline需要将其在settings.py中添加到ITEM_PIPELINES列表中。如:
1
2
3
4
ITEM_PIPELINES = { 'huaban.pipelines.DownloadPipeline':2, 'huaban.pipelines.HuabanPipeline':3 }
设置scrapy的工程目录,即HuabanWallpaper/huaban目录,为当前目录,在Terminal执行命令scrapy crawl huabanSpider,可以在控制台运行huabanSpider,进行调试。在此处运行与在顶层运行的目录不同,要注意代码中的相对路径。
与huabanItem类似,定义保存图片需要的数据结构。
1 2 3 4 5 6 7 class PicItem (scrapy.Item) : file_urls = Field() files = Field() folder = Field() pic_type = Field() pin_id = Field()
注意其中的file_urls和files字段是使用scrapy的FilesPipeline所必需的,将文件地址存入file_urls则FilesPipeline会自动将文件内容填充files用于下载。为使用FilesPipeline还需要在settings.py中添加FILES_STORE = 'pic'指定文件下载父目录。ImagesPipeline 是因为其默认将所有图片都转为JPEG格式,所以干脆改用FilesPipeline 直接下载原始文件。
downloadSpider抓取本地xml文件,解析出刚才保存的图片信息,填充item并下载。
1
2
3
4
5
6
7
8
9
10
11
12
13
14
15
16
17
18
19
20
21
22
23
24
25
26
class downloadSpider (CrawlSpider) : name = 'downloadSpider' allow_domain = ['http://img.hb.aicdn.com/' ] start_urls = [] def __init__ (self, **kw) : super(downloadSpider, self).__init__(**kw) url = kw.get('url' ) or kw.get('domain' ) or "pic_urls" self.chooseone = kw.get('chooseone' ) url = "file://" +os.path.abspath("." )+"/" +url self.start_urls = [url] def parse (self, response) : index = int(0 ) for t in response.xpath("//pic" ): index = index + 1 rn = random.randint(0 ,index-1 ) count = int(0 ) for sel in response.xpath("//pic" ): item = PicItem() item['file_urls' ] = sel.xpath("./pic_url/text()" ).extract() item['folder' ] = sel.xpath("./folder/text()" ).extract() item['pic_type' ] = sel.xpath("./pic_type/text()" ).extract() item['pin_id' ] = sel.xpath("./pin_id/text()" ).extract() if rn != count and self.chooseone: item['file_urls' ] = [] count = count +1 yield item
该Spider类样式与前文huabanSpider基本相同。只是用于解析的xpath不同而已。chooseone表示是否开启随机下一张,如果开启就只下载一张,不开启就全部下载。
downloadPipeline将FilesPipeline自动下载下来的文件重命名并存入指定文件夹。
1 2 3 4 5 6 7 8 9 10 11 12 class DownloadPipeline (FilesPipeline) : def get_media_requests (self, item, info) : return [Request(x,meta={'item' :item}) for x in item.get('file_urls' , [])] def file_downloaded (self, response, request, info) : path = response.meta.get('item' )['folder' ][0 ] + '/' + response.meta.get('item' )['pin_id' ][0 ] + '.' + response.meta.get('item' )['pic_type' ][0 ] buf = BytesIO(response.body) self.store.persist_file(path, buf, info) checksum = md5sum(buf) return checksum
唯一要注意的就是在file_downloaded函数中对path变量的重新赋值。其余部分都与其父类FilesPipeline相同。
与前文一样,在huaban目录中执行命令scrapy crawl downloadSpider,即可在控制台运行downloadSpider调试。
在main.py中,按钮的响应函数需要相应开启对应的Spider进行抓取或下载。官网上是这么写的 :
1
2
3
4
5
6
7
8
9
10
11
12
13
14
from twisted.internet import reactorfrom scrapy.crawler import Crawlerfrom scrapy import log, signalsfrom testspiders.spiders.followall import FollowAllSpiderfrom scrapy.utils.project import get_project_settingsspider = FollowAllSpider(domain='scrapinghub.com' ) settings = get_project_settings() crawler = Crawler(settings) crawler.signals.connect(reactor.stop, signal=signals.spider_closed) crawler.configure() crawler.crawl(spider) crawler.start() log.start() reactor.run()
但这种方式只能开启Spider一次,再次开启就会出现ReactorNotRestartable的错误。具体到本项目中就是说,点击Apply按钮抓取一次,之后换个网址再点击就会出错,这当然是不可接受的。
在stackoverflow上看到了一种解决方法:
1 2 3 4 5 6 7 8 9 10 11 12 13 14 15 16 17 18 19 20 21 22 23 24 25 26 27 28 29 30 log.start() class UrlCrawlerScript (Process) : def __init__ (self, spider) : Process.__init__(self) setting = Settings() setting.setmodule(settings,1 ) self.crawler = Crawler(setting) if not hasattr(project, 'crawler' ): self.crawler.configure() self.crawler.signals.connect(reactor.stop, signal = signals.spider_closed) self.spider = spider def run (self) : self.crawler.crawl(self.spider) self.crawler.start() reactor.run() def start_crawling (url) : spider = huabanSpider(domain=url) crawler = UrlCrawlerScript(spider) crawler.start() crawler.join() def start_downloading (filename, chooseone) : spider = downloadSpider(domain=filename,chooseone=chooseone) crawler = UrlCrawlerScript(spider) crawler.start() crawler.join()
start_crawling()和start_downloading()就是两个创建并开启爬虫的函数。类UrlCrawlerScript封装了部分爬虫创建与配置的功能,并使用多线程规避了ReactorNotRestartable的问题。
GUI部分简单使用了Python的标准Tkinter模块。包括一个输入框和三个按钮。
1
2
3
4
5
6
7
8
9
10
11
12
13
14
15
16
17
18
19
20
21
22
# set up canvas root = Tk() root.title("HuabanWallpaper") # entry for enter board url url_text = StringVar() url_entry = Entry(root, width=30, textvariable=url_text) url_entry.pack() # button to apply board url and start crawling def crawling_all_pics(): start_crawling(url_text.get()) Button(root, text="Apply",command=crawling_all_pics).pack() # button for download all picture def download_all_pics(): start_downloading("pic_urls", False) Button(root, text="Download Board", command=download_all_pics).pack() # button for randomly choose a picture as wallpaper def shuffle_wallpaper(): start_downloading("pic_urls", True) set_wallpaper() Button(root, text="Shuffle Wallpaper", command=shuffle_wallpaper).pack() # running root.mainloop()
1
2
3
4
5
6
7
8
9
10
11
12
13
14
15
16
17
18
19
20
21
22
23
24
25
26
27
28
29
30
31
32
33
34
35
36
37
def get_picture_list (filedir) : filelist = os.listdir(filedir) pic = "" if any(filelist): while (len(pic) == 0 or not os.path.isfile(filedir+pic)): rn = random.randint(0 , len(filelist)-1 ) pic = filelist[rn] return pic def get_dir_list (topdir) : filelist = os.listdir(topdir) subdir = "" if any(filelist): while (len(subdir) == 0 or not os.path.isdir(topdir+subdir)): print(topdir+'/' +subdir) rn = random.randint(0 , len(filelist)-1 ) subdir = filelist[rn] return subdir def set_ubuntu_wallpaper () : board = '' if re.findall('\d+' ,url_text.get()): board = re.findall('\d+' ,url_text.get())[-1 ] if len(board) == 0 : board = get_dir_list(os.path.abspath("." )+"/pic/" ) if len(board) == 0 : return filedir = os.path.abspath("." )+"/pic/%s/" %board pic = get_picture_list(filedir) path = filedir + "/" + pic path = path.encode('utf-8' ) uri = 'file://' + urllib.quote(path) bg_setting = Gio.Settings.new('org.gnome.desktop.background' ) bg_setting.set_string('picture-uri' , uri) bg_setting.apply() os.system('gsettings set org.gnome.desktop.background picture-options "spanned"' )
set_ubuntu_wallpaper首先得到用户输入的画板id,查找对应目录。如果用户没有输入,就从父目录pic下随机选一个目录,函数get_dir_list。目录定下后,从该目录中随机选择一个文件,函数get_picture_list。os.system()调用shell的方式不可行,网上说的什么DISPLAY:=0之类的方法也不管用,可能就是权限的问题吧。
终于写完啦!ヽ(´∀`)ノ
[1] http://doc.scrapy.org/en/0.24/index.html http://yupengyan.com/how-to-download-a-file-with-scrapy.html https://github.com/scrapy/scrapy/blob/master/scrapy/contrib/pipeline/files.py http://www.w3school.com.cn/xpath/xpath_syntax.asp http://stackoverflow.com/questions/8372703/how-can-i-use-different-pipelines-for-different-spiders-in-a-single-scrapy-proje http://stackoverflow.com/questions/8550114/can-scrapy-be-used-to-scrape-dynamic-content-from-websites-that-are-using-ajax http://www.cnblogs.com/kissdodog/archive/2012/12/19/2825699.html http://stackoverflow.com/questions/22116493/run-a-scrapy-spider-in-a-celery-task http://stackoverflow.com/questions/12707411/setting-background-with-python2-7-crontab-in-ubuntu-12-04 https://wiki.archlinux.org/index.php/GNOME_(简体中文)